
써보니 고용량 멀티탭의 두 조작부, 전기를 차단하는 레버와 노란 점검 버튼

써보니 고용량 2구 제품과 차단기 레버·노란 점검 버튼 안내

SUBONY JOURNAL · BREAKER & TEST

큰 레버는 전원을 차단하는 장치.
작은 노란 버튼은 그 장치가 움직이는지 확인하는 장치.

써보니 고용량 멀티탭을 보면 소켓 옆에 투명 덮개가 있고, 그 안에 검은 레버와 작은 노란 버튼이 나란히 있습니다. 익숙한 멀티탭의 전원 버튼처럼 보이지만, 두 조작부는 서로 다른 일을 합니다.

레버가 달린 부분은 누전·과부하에 대응하는 차단기이고, 노란 버튼은 차단 동작을 확인하는 점검 버튼입니다. 이 구분에서 출발하면 고용량 제품을 고르는 이유부터 실제 점검 방법까지 한 흐름으로 이해할 수 있습니다.

LEVER

보호를 위한 차단

조건에 맞는 이상을 감지하면 접점을 열어 연결 기기로 가는 전원을 끊습니다.

YELLOW TEST

작동 여부의 점검

누전 감지 계통에 시험 조건을 만들어 차단기가 동작하는지 확인합니다.

2 / 3 OUTLETS

필요한 기기에 집중

소켓 수와 관계없이 함께 사용하는 기기의 전체 정격을 확인합니다.

써보니 고용량 2구 제품과 차단기 레버·노란 점검 버튼 안내

01 · READ THE TWO CONTROLS

켜고 끄는 손잡이보다, 차단기의 역할을 먼저 보세요

일반 멀티탭의 사각 스위치는 사용자가 전원을 켜고 끄기 위해 누르는 조작부입니다. 개별스위치형에서는 특정 소켓만 선택할 수 있고, 통합스위치형에서는 여러 소켓을 함께 조작합니다. 일부 스위치에는 과부하 보호 기능도 들어 있으므로, 모양만으로 보호 기능이 전혀 없다고 판단해서도 안 됩니다.

써보니 고용량 제품의 덮개 안 레버는 누전차단기 조작부입니다. 사용자가 손을 대지 않아도 보호 동작 조건에 해당하면 차단기가 접점을 열고 전원을 끊습니다. 이 자동 차단 기능이 일상적인 전원 조작 스위치와 구분되는 핵심입니다.

레버를 손으로 내려 전원을 끊거나 점검 후 복귀할 수는 있습니다. 따라서 ‘전원을 켜고 끄는 기능이 전혀 없다’는 뜻은 아닙니다. 다만 이 글에서 레버를 차단기로 부르는 이유는 기기를 수시로 켜고 끄는 편의 기능보다 이상 상황의 전원 차단이 중심이기 때문입니다. 가전의 평소 운전·정지는 기기 자체 조작부와 설명서를 따릅니다.

사진 속 사각 스위치와 비교해 보세요

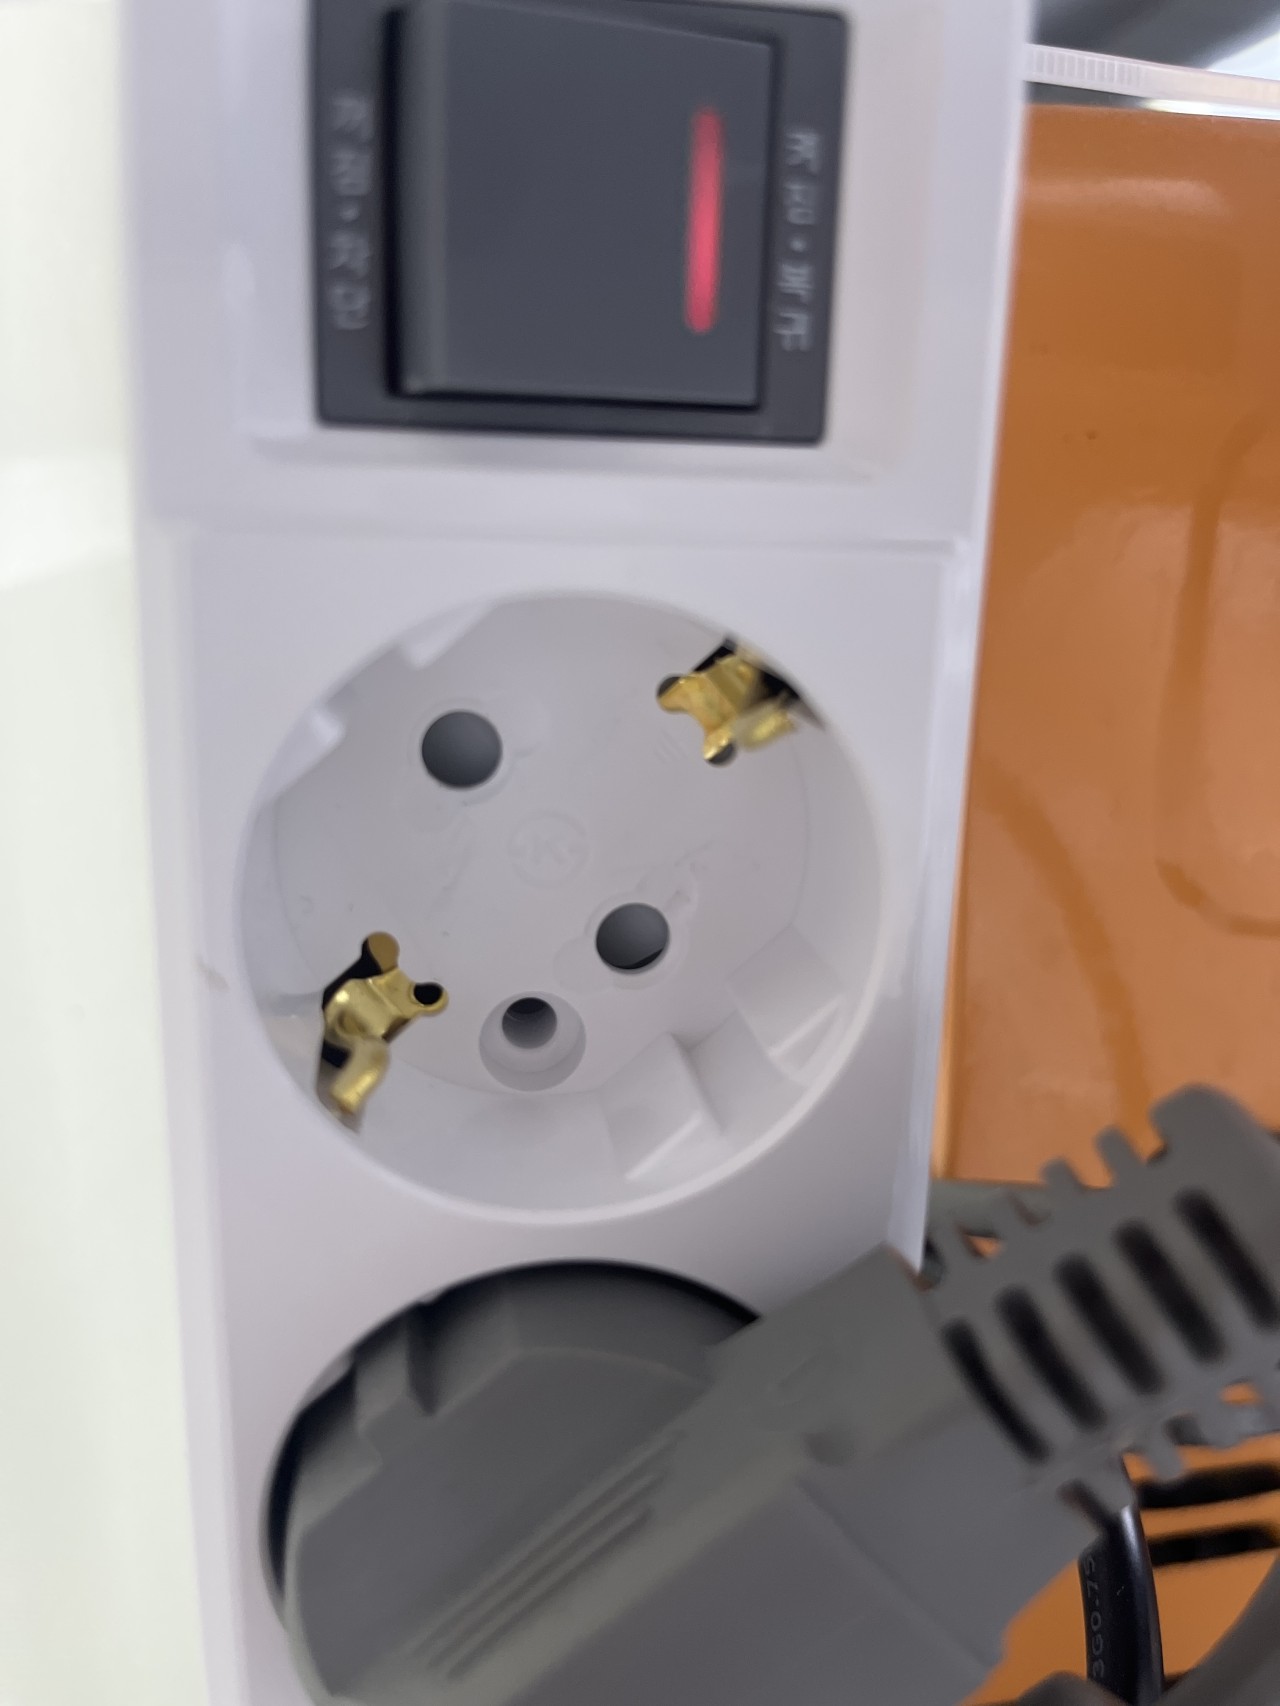
아래 두 사진은 일반 조작 스위치 형태를 비교하기 위한 실제 제품 사진입니다. 사각 스위치의 표시등이나 과부하 표시는 노란 점검 버튼을 갖춘 고용량 누전차단기의 기능과 구분해 읽습니다.
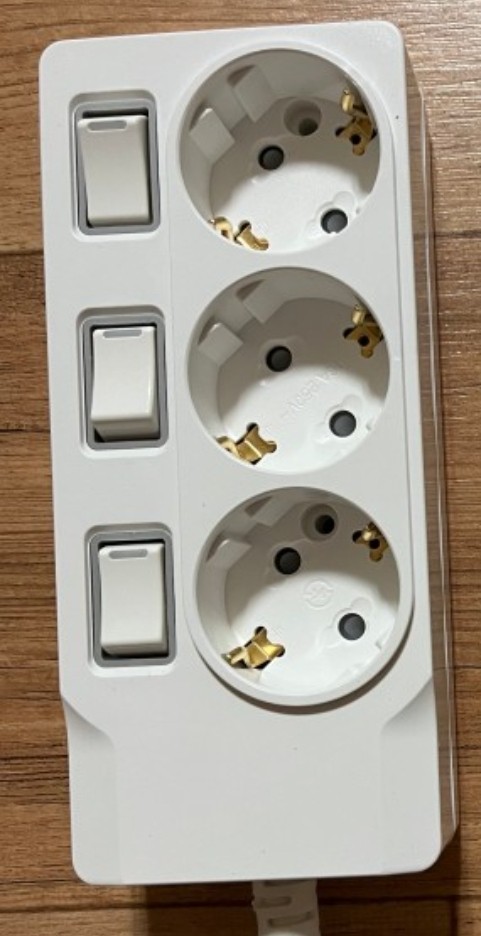
각 소켓 옆에 사각 조작 스위치가 있는 3구 멀티탭
표시등이 있는 사각 스위치와 접지 소켓 근접 사진

02 · LEAKAGE / OVERLOAD / SHORT CIRCUIT

누전과 과부하, 같은 차단기가 서로 다른 이상을 살핍니다

누전부터 쉽게 생각해 보겠습니다. 기기로 전기를 보내는 길과 되돌아오는 길이 있을 때, 정상적인 회로에서는 두 전류가 서로 균형을 이룹니다. 절연이 손상되어 다른 경로로 일부 전류가 빠져나가면 그 균형에 차이가 생깁니다. 누전 감지 기능은 이 차이를 살펴 정해진 조건에 도달했을 때 전원을 차단합니다.

과부하는 다른 문제입니다. 전류가 정상 경로로 돌아오더라도 연결한 기기들이 요구하는 전체 전류가 과도하게 커질 수 있습니다. 두 소켓에 연결한 기기를 동시에 가동했을 때 각각의 사용량이 합쳐진다는 점이 중요합니다. 전류의 불균형을 보는 누전 보호와, 전류의 크기를 보는 과전류 보호는 같은 뜻이 아닙니다.

단락은 두 전원 경로가 매우 낮은 저항으로 연결되는 고장으로, 큰 고장 전류가 흐를 수 있는 상황입니다. 제품 포장은 누전·과부하와 함께 단락사고 예방을 안내합니다. 그러나 차단기가 달렸다는 이유로 의도적으로 과부하나 단락을 만들어 성능을 시험해서는 안 됩니다.

보호접지는 또 다른 역할을 맡습니다. 접지선은 고장 때 전류가 돌아갈 수 있는 경로를 제공하고, 차단기는 조건에 따라 회로를 끊습니다. 노란 버튼은 접지선을 켜거나 끄는 버튼이 아닙니다.

누전

서로 다른 전류

감시하는 두 전류의 균형이 어긋나는 상황을 살핍니다.

과부하

너무 커진 전류

정상 경로라도 합산 사용 전류가 과도해질 수 있습니다.

단락

급격히 커지는 고장 전류

잘못 이어진 경로의 고장입니다. 직접 재현해 시험하지 않습니다.

03 · PRESS TEST, WATCH THE TRIP

노란 버튼을 누르면, 무엇이 일어나는 걸까요?

노란 점검 버튼을 누르면 차단기 안의 시험 회로가 작동해 누전 감지 계통이 알아차릴 수 있는 전류 차이를 만듭니다. 그 차이를 감지한 차단기는 접점을 열어 출력 전원을 끊습니다. 제품 밖으로 실제 누전을 만들거나 전선을 만져 시험하는 과정이 아닙니다.

정상적인 점검의 결과는 버튼이 들어가는 감촉에 그치지 않습니다. 차단기가 동작하고 레버가 차단 위치로 이동하는지를 확인해야 합니다. 보호 대상 출력에 전원이 계속 공급되거나, 정상 점검 조건에서도 차단되지 않으면 사용을 멈추고 판매처·제조사에 점검을 요청합니다.

아래에서 ‘노란 버튼 점검’을 누르면 시험 조건 발생 → 감지 → 레버 이동과 출력 차단 순서를 볼 수 있습니다. ‘원리 펼쳐보기’에서는 감지부와 접점의 역할을 나누어 살펴봅니다. 실제 제품을 열어 확인할 필요는 없습니다.

SUBONY · BREAKER / TEST

노란 버튼에서 시작되는 차단 동작

제품 조작부와 감지 원리를 번갈아 살펴보세요.

정상 상태 · 출력 연결
차단기 모형을 불러오는 중입니다.
드래그로 다른 각도 보기
두 전류가 균형을 이룹니다

노란 버튼을 누르면 감지 → 차단 순서를 느리게 보여줍니다.

감시 전류 ①
감시 전류 ②
정상시험 조건출력 차단
드래그 회전 · 버튼 확대

작동 순서를 느리게 보여줍니다. 막대는 전류 차이의 개념이며 실측값이 아닙니다.

04 · WHAT THE TEST DOES NOT MEASURE

점검에 성공했다고, 모든 상태가 확인된 것은 아닙니다

노란 버튼은 누전 감지 계통과 차단 동작을 정기적으로 확인하는 수단입니다. 몇 와트까지 사용해도 되는지 계산하거나 남은 용량을 측정하는 버튼은 아닙니다. 점검을 통과한 뒤에도 제품 전체 정격을 넘는 기기를 연결하면 안 됩니다.

버튼 점검은 벽 콘센트의 접지 연속성, 전선 전체의 절연 상태, 각 소켓의 접촉 상태를 하나씩 측정해 주지 않습니다. 과부하·단락 보호의 모든 성능을 실측하는 시험도 아닙니다. 차단 시간과 감도 같은 세부 성능 확인에는 적절한 시험 장비와 전문 점검이 필요합니다.

또한 차단기가 내려가지 않았다는 사실만으로 발열·손상·접촉 불량을 배제할 수 없습니다. 플러그가 헐겁거나 변색·탄 냄새·비정상적인 열이 있다면 레버 위치와 관계없이 사용을 중단합니다. 보호 장치는 정격 준수와 상태 확인을 대신하는 것이 아니라 함께 작동하는 안전 요소입니다.

점검 버튼을 용량 확인 버튼으로 사용하지 마세요

노란 버튼이 정상 동작했다는 사실과 고용량 가전 두세 대를 동시에 사용할 수 있다는 판단은 별개입니다. 기기 조합은 소비전력·정격전류·전원 연결 조건으로 확인합니다.

05 · TWO OR THREE, ONE SHARED LIMIT

2구·3구는 연결 자릿수, 고용량은 전체 조건입니다

써보니 고용량 제품은 2구와 3구로 구성됩니다. 많은 기기를 한꺼번에 모으기보다는, 필요한 고용량 기기의 전원 연결을 계획하는 제품군입니다. 3구 제품을 고른다고 소켓 한 칸마다 독립된 최대 용량이 생기는 것은 아닙니다. 전원 코드와 입력 플러그를 함께 사용하므로 실제 동시 사용량을 합쳐 확인해야 합니다.

써보니 고용량 멀티탭의 정격은 16A 250V입니다. 국내 220V에서 여러 기기를 함께 쓸 때 권장 합산은 3,200W입니다. 16A와 250V를 곱한 값을 그대로 연결해도 되는 양으로 읽지 않고, 꽂은 기기의 소비전력을 모두 더해 3,200W 안에서 씁니다.

합산이 3,200W 안이라도 모터·전자회로가 있는 기기는 역률과 기동 특성 등이 다를 수 있으므로 정격전류, 제품 안내, 벽 콘센트·공급 회로의 조건을 함께 확인합니다. 더 낮은 제한이 있거나 기기 설명서가 벽 콘센트 단독 연결을 요구하면 그 조건을 우선합니다.

차단기 부품에 보이는 전류 표시도 멀티탭 완제품의 허용 전류와 구분해야 합니다. 부품의 표기를 가져와 본체·코드·플러그까지 같은 정격이라고 확대하지 않습니다. 차단기가 떨어지는 지점을 찾아 사용량을 정하는 방식도 적절하지 않습니다.
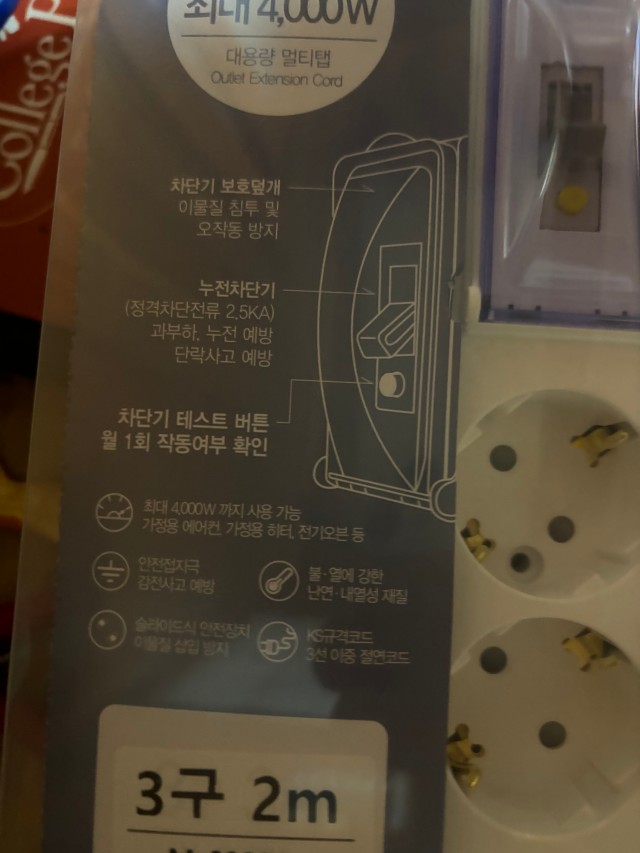
3구 2m 표시와 노란 점검 버튼이 보이는 써보니 고용량 제품

06 · A MONTHLY ROUTINE

점검은, 멈춰도 되는 시간을 잡는 일부터 시작합니다

실제 써보니 고용량 제품 포장에는 차단기 테스트 버튼을 월 1회 작동 확인하도록 안내합니다. 사용 중인 제품의 설명서·표시를 기준으로 정기적인 점검 시간을 정하세요. 점검하면 출력 전원이 끊기므로 먼저 연결 기기의 작업을 마무리해야 합니다.

전원이 없는 멀티탭에서 버튼을 눌러 보는 것과 전기적인 차단 점검은 다릅니다. 시험 회로가 동작하려면 정상적인 공급 전원과 차단기의 투입 상태가 필요합니다. 기기는 먼저 정상 종료하고 멀티탭 출력에서 분리한 다음, 손과 주변이 건조하고 제품에 이상이 없는 상태에서 제품 안내에 따라 점검합니다.

  1. 01

    연결 기기를 먼저 종료합니다

    저장 중인 작업과 운전을 마치고, 전원이 끊겨도 되는 시간을 확보합니다. 가전의 정지·재시동 안내를 따릅니다.

  2. 02

    제품과 주변 상태를 살핍니다

    물기·손상·변색·탄 냄새가 있으면 점검을 위해 다시 전원을 넣지 않습니다. 이상 없는 제품만 정상 점검 절차로 진행합니다.

  3. 03

    공급 전원과 레버 상태를 확인합니다

    부하 기기를 분리한 뒤, 설명서에 맞는 벽 전원에 연결하고 차단기를 정상 투입 상태로 둡니다.

  4. 04

    노란 점검 버튼을 짧게 누릅니다

    차단기 레버가 차단 위치로 이동하는지 확인합니다. 반응이 없으면 버튼을 반복해서 누르거나 레버를 고정하지 않습니다.

  5. 05

    정상 점검과 실제 고장을 구분해 마칩니다

    계획한 점검으로 정상 차단된 경우에만 제품 안내에 따라 복귀합니다. 기기 재연결·재가동은 각 기기 설명서를 따릅니다.

복귀되지 않으면 여기서 멈춥니다

정상 전원과 올바른 점검 조건에서도 동작하지 않거나, 부하를 분리했는데도 차단기가 유지되지 않는다면 사용을 중지하고 제품 점검을 받습니다.

07 · AFTER AN UNEXPECTED TRIP

쓰다가 내려간 레버는, 원인을 살펴보라는 신호입니다

계획한 점검 때문에 내려간 경우와 사용 도중 저절로 차단된 경우는 대응이 다릅니다. 후자는 연결 기기의 누전, 과도한 동시 사용, 코드 손상 등 확인이 필요한 상황입니다. 레버가 내려간 모습만 보고 ‘무조건 과부하’ 또는 ‘멀티탭 고장’이라고 단정할 수는 없습니다.

우선 기기의 운전을 멈추고, 안전하게 할 수 있는 범위에서 입력 전원을 분리합니다. 물기·탄 흔적·녹은 부분·심한 발열이 있으면 손대거나 재투입하지 말고 적절한 점검을 요청합니다. 연결한 기기의 정격과 동시에 사용한 조합, 코드가 눌리거나 손상된 곳을 확인하되 본체를 분해하지 않습니다.

원인 확인 없이 레버만 계속 올리면 같은 이상 상태에 다시 전원을 공급하게 됩니다. 레버가 유지되지 않거나 재차 차단된다면 반복 사용을 멈추고 멀티탭과 기기를 함께 점검받으세요. 여러 보호 장치가 있는 회로에서도 반드시 멀티탭 차단기만 먼저 내려간다고 보장할 수는 없습니다.
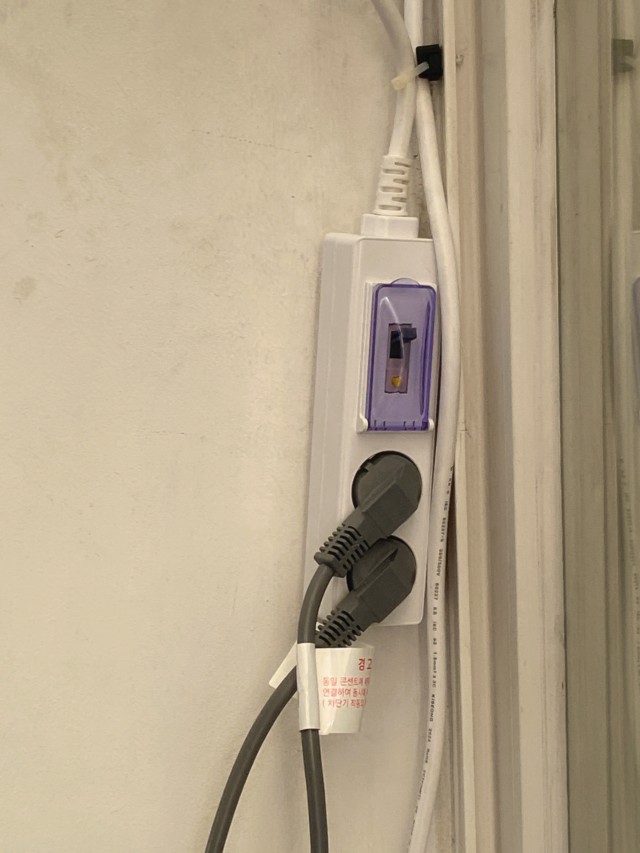
차단기 덮개와 두 플러그가 보이는 써보니 고용량 2구 멀티탭

08 · THE COVER IS PART OF THE EXPERIENCE

덮개를 닫아 보호하고, 점검할 때는 닿을 수 있게

투명 보호덮개는 차단기 조작부가 다른 물건에 눌리거나 이물질에 노출되는 것을 줄이기 위한 부분입니다. 투명해서 레버 위치를 살필 수 있고, 점검할 때 열어 노란 버튼에 접근할 수 있습니다. 덮개를 닫았다고 방수 제품이 되거나 물이 튀는 장소에 두어도 되는 것은 아닙니다.

고용량 멀티탭을 배치할 때는 소켓과 코드 길이만 보지 말고 덮개가 열리는 공간까지 남겨 두세요. 가구 깊숙한 곳에 밀어 넣거나 물건으로 덮으면 정기 점검이 어려워집니다. 아래 실제 사진에서도 조작부 위치를 확인할 수 있습니다. 사진 속 기기의 종류·소비전력이나 설치 적합성까지 사진만으로 판단하지는 않습니다.

써보니 고용량 멀티탭을 이해하는 기준은 세 가지입니다. 레버는 보호 동작과 연결된 차단기 조작부, 노란 버튼은 그 동작을 확인하는 점검 조작부, 2구·3구는 정격 범위 안에서 사용할 연결 자릿수입니다. 이 역할을 구분하면 제품을 고를 때도, 정기적으로 살필 때도 확인해야 할 지점이 분명해집니다.
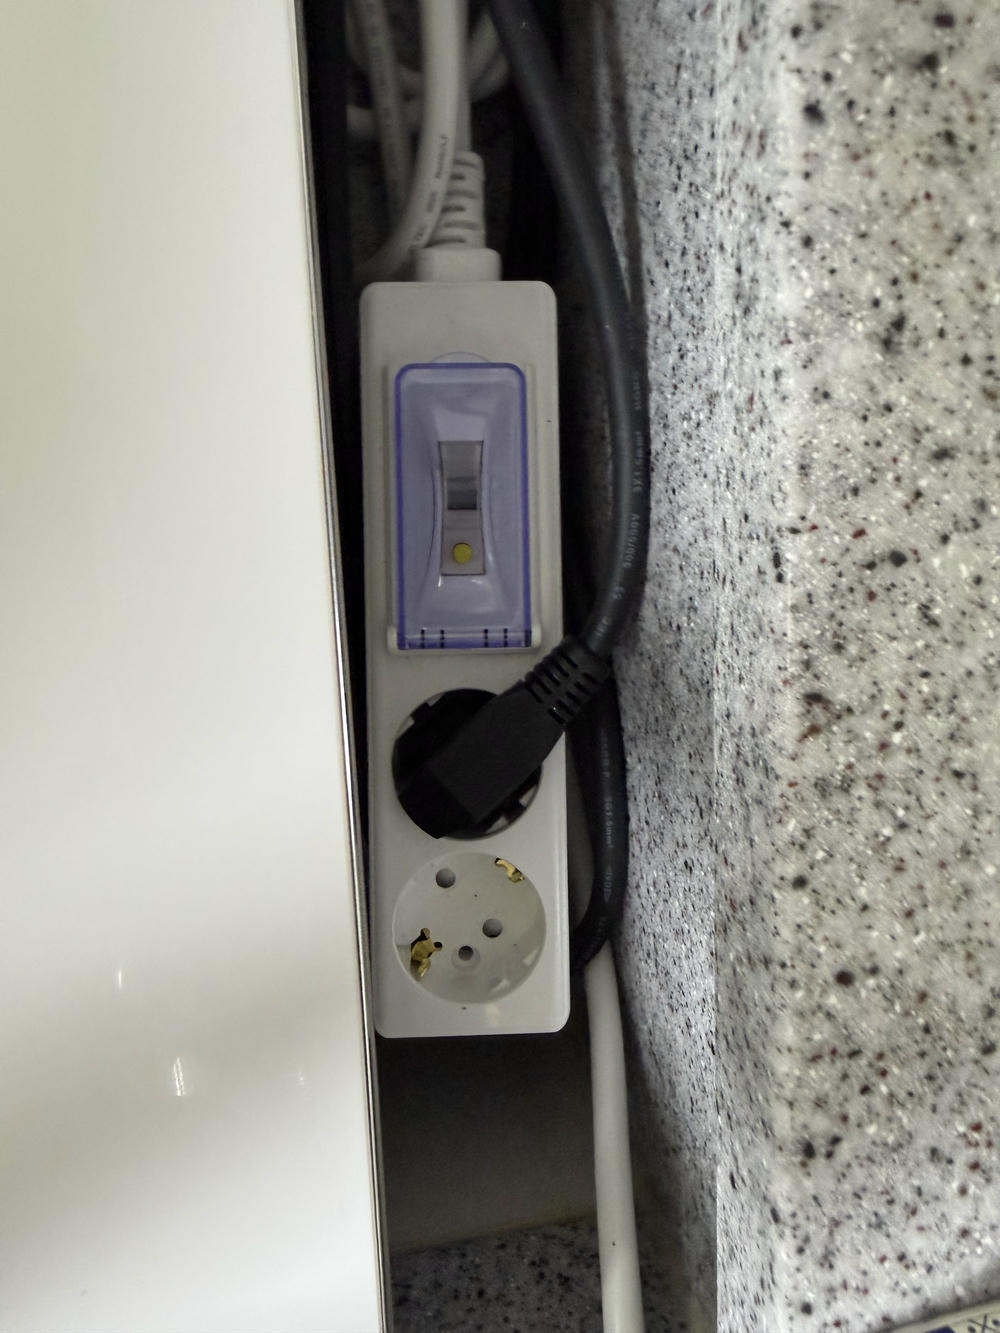
투명 덮개 안 차단기 레버와 노란 점검 버튼이 보이는 써보니 고용량 멀티탭

써보니 멀티탭 3D로 비교하기

크게 보기 ↗

ENGLISH EDITION · UNDERSTANDING THE BREAKER

Two controls, two different jobs

A closer look at the protective breaker, yellow test button and shared rating of Subony high-capacity power strips.

01 · Start with the breaker, not just the handle

The transparent cover on a Subony high-capacity power strip contains a dark lever and a small yellow button. They belong to the same protective assembly, but they have different jobs. The lever operates the circuit breaker. The yellow button provides a routine check of its residual-current tripping function. Understanding that distinction is more useful than treating both controls as ordinary power switches.

A conventional rocker switch lets a person select whether a socket, or a group of sockets, receives power. Some rocker assemblies also incorporate overload protection, so their appearance alone does not establish the complete protection specification. The covered breaker on the high-capacity range is described in the product information as providing leakage and overload protection. It can disconnect the output automatically when the relevant operating conditions are met.

The lever can also be operated manually for disconnection and restoration. Calling it a protective breaker does not mean that manual switching is physically impossible. It means that protection is its defining role, rather than convenient routine control of an appliance. Use the appliance’s own controls and instructions for its normal operating cycle. The photographs of rectangular rockers in the Korean section provide a visual comparison; they should not be mistaken for the yellow-test-button assembly.

02 · Leakage, overload and short circuit are different conditions

For a simple explanation of leakage detection, imagine the two conductors supplying a connected appliance. Under normal conditions, the currents monitored in those conductors balance each other. If some current returns by another path because of an insulation fault, the monitored currents no longer balance. Residual-current protection responds to that difference according to its operating characteristics.

An overload can exist even when the currents remain balanced. Several appliances can draw too much total current through the same input cord and plug. Overcurrent protection addresses current magnitude, while residual-current protection addresses the difference between monitored currents. The two functions should not be described as interchangeable. A short circuit is another fault condition: an unintended path with very low resistance can produce a large fault current. Subony packaging identifies short-circuit protection alongside leakage and overload protection.

Protective earth has a separate purpose. It provides an intended protective path for fault current where the installation and equipment require it. It is not the yellow test button, and the test button does not switch the earth conductor. Never create a real leakage path, overload or short circuit to see whether the breaker works. The built-in test facility is the appropriate user control for the prescribed routine check.

03 · Follow the sequence behind the yellow button

Pressing the yellow test button activates an internal test circuit. This creates a difference that the residual-current sensing system can detect. The trip mechanism then opens the protected supply path and interrupts the output. The test does not require the user to expose wiring, open the product housing or deliberately cause electricity to leak outside the product.

In the interactive model, the yellow-button sequence progresses from a test condition to detection and then disconnection. The lever changes position as the illustrated contact opens. The expanded view separates the sensing and contact functions so their relationship is easier to follow. Its timing is deliberately slowed for explanation; it does not measure the trip time of an actual product. The arrangement is a functional illustration, not a wiring instruction for dismantling a power strip.

For a real routine check, simply feeling the button move is not enough. The expected result is that the breaker operates and its lever moves to the tripped position. If the unit does not operate under the specified test conditions, or the protected output remains supplied, stop using it and seek product support. Resetting an unexplained fault is a different matter from restoring supply after a planned, successful test.

04 · A successful button test has a defined scope

The test button checks the residual-current tripping function. It is not a wattmeter, an available-capacity indicator or a way to determine which combination of appliances can be used. A successful test does not increase the rating of the power strip and does not make an excessive combined load acceptable.

The same check does not independently measure the earth continuity of the wall socket, insulation throughout the installation, or contact quality at every socket. Nor is it a complete instrumented verification of overload and short-circuit performance. Detailed assessment of tripping sensitivity and time requires suitable test equipment and competent inspection. A routine button check and a professional electrical inspection answer different questions.

A breaker remaining in its normal position also does not rule out every hazardous condition. Loose plugs, discoloration, a burning smell or abnormal heating require attention even if no trip has occurred. Protection must work alongside appropriate ratings, sound connections and regular condition checks. Do not interpret the presence of a protective device as permission to ignore damage or use the product outside its stated conditions.

05 · Two or three outlets share the input rating

The Subony high-capacity range includes two-outlet and three-outlet products. These provide connection positions for a planned selection of suitable appliances. An additional socket does not create an additional independent power allowance. The connected appliances still share the input plug and cord, so their simultaneous demand must be considered together.

Subony high-capacity strips are rated 16 A 250 V. On the Korean 220 V supply, the recommended combined load for appliances used together is 3,200 W. The product of the rated current and voltage is not an allowance to use in full; add up the power consumption of every connected appliance and keep the total within 3,200 W.

Even within 3,200 W, motors and electronic loads can have different power factors and starting characteristics. Check appliance input-current information as well as power consumption, the instructions for the complete strip, and the limits of the wall outlet and supply circuit. Follow a lower applicable restriction or an appliance instruction requiring a dedicated wall connection. A current marking on an internal breaker component is not a replacement rating for the complete cord, plug and socket assembly.

06 · Plan the interruption before the monthly test

The photographed Subony packaging calls for checking the test button once a month. Follow the instructions supplied with the actual product and choose a time when disconnecting power will not interrupt an important operation. Save work and shut down appliances normally before testing. A device that needs a controlled shutdown should not be stopped abruptly merely to demonstrate the breaker.

An electrical button test needs the appropriate supply and the breaker in its normal closed position. Pressing the button on an unplugged strip does not perform the same check. After shutting down and disconnecting the connected loads, inspect the product and surrounding area. Do not energize a unit that is wet, damaged, discolored or showing signs of overheating. With a sound product, dry hands and an appropriate supply, follow the product instructions to put the breaker in its normal operating state.

Press the yellow button briefly and check that the breaker operates. Do not repeatedly press an unresponsive button or hold the lever in place. After a planned test that operates normally, restore the breaker according to the product instructions and reconnect or restart appliances in accordance with their own guidance. If the breaker will not remain set with the loads removed, discontinue use and obtain support.

07 · Treat an unexpected trip as a reason to investigate

A trip during use is different from a planned button test. Possible causes include a connected appliance fault, excessive combined demand or damaged wiring. The position of the lever alone does not tell you which cause is responsible. It is not enough to label every trip as an overload, and a trip does not automatically prove that the power strip itself has failed.

Stop the connected equipment and isolate the input supply where it is safe to do so. Do not touch or re-energize equipment with moisture, melted areas, burning marks or severe heating. Check the appliance ratings and the combination that was operating, and look for visible cord damage without opening the product housing. Obtain qualified help when the cause is uncertain or when damage is present.

Repeatedly raising the lever without resolving the cause can repeatedly energize the same fault. If the breaker trips again or will not stay set, stop using the arrangement and have the strip and appliances checked. Where a building circuit has additional protective devices, do not assume that the strip’s breaker must always operate first. The behavior depends on the devices and installation, not simply on which breaker is physically closest to the appliance.

08 · Keep the protective cover accessible

The transparent cover helps shield the operating parts from accidental contact with nearby objects and from foreign material. It also allows the lever position to be observed. Open the cover when access to the test button is needed, and follow the product instructions when closing it afterwards. A cover is not evidence of a waterproof rating, and its presence does not make a wet location suitable.

Allow space for the cover to open when placing the power strip. A unit pushed deep behind furniture or covered by stored objects becomes difficult to inspect. The installation photographs show where the controls are located, but they do not establish the connected appliance type, power demand or suitability of an entire installation. Those questions require information beyond the photograph.

Three distinctions make the product easier to understand: the lever belongs to a protective breaker; the yellow button checks its residual-current trip action; and the outlet count describes connection positions within a shared rating. Keep those roles separate when choosing a product, planning connected loads and carrying out the regular check. The practical benefit is a clearer routine: select appropriately, retain access to the controls and respond to abnormal behavior instead of repeatedly resetting it.

추가 정보조작부 비교 · 정격 읽기 · 월간 점검표 · FAQ

헷갈리는 다섯 가지를 나누어 보기

항목무엇을 하는가구분해서 볼 점
일반 조작 스위치사용자가 소켓 전원을 켜고 끄도록 조작일부 제품은 과부하 보호 겸용. 형태만으로 누전 보호를 단정하지 않음
고용량 차단기 레버보호 동작 때 회로 차단, 수동 개폐·복귀 조작기기 자체 운전 버튼과 역할이 다름
노란 점검 버튼누전 감지 계통에 시험 조건을 만들어 동작 확인용량 측정·접지 측정·전체 보호성능 시험과 다름
투명 보호덮개조작부 보호와 위치 확인, 점검 때 개방방수 등급이나 밀폐 성능을 뜻하지 않음
2구·3구 소켓필요한 기기를 연결하는 자리구수가 늘어도 입력 전체 정격이 칸마다 생기지 않음

원리를 이해하는 일곱 단어

누전
의도한 경로 밖으로 전류가 흐르는 현상. 감지되는 전류 차이와 보호 동작 조건을 함께 봅니다.
잔류전류
감시하는 전원 도체 전류의 합에서 남는 차이. 누전 보호가 살피는 핵심량입니다.
과부하
정상 경로에서도 사용 전류가 허용 조건보다 과도해지는 상태입니다.
단락
전위가 다른 전원 경로 사이에 의도하지 않은 낮은 저항의 연결이 생기는 고장입니다.
트립
보호 기구가 작동해 접점을 열고 회로를 차단하는 동작입니다.
정격전류
정해진 조건에서 제품에 적용되는 전류 기준입니다. 완제품과 부품의 표기를 구분합니다.
차단용량
규정된 조건에서 차단할 수 있는 고장 전류의 크기입니다. 기기를 평소 연결해 쓸 수 있는 전류와 다릅니다.

월간 점검 때 확인할 여덟 가지

  • 사용 중인 제품의 점검 주기와 방법을 확인했는가
  • 연결 기기의 작업·운전을 정상 종료했는가
  • 부하 기기를 출력 소켓에서 분리했는가
  • 제품·손·주변에 물기나 손상 흔적이 없는가
  • 정상 공급 전원과 차단기 투입 상태를 확인했는가
  • 노란 버튼을 눌렀을 때 차단기가 동작하는가
  • 계획한 정상 점검 이후에만 안내대로 복귀했는가
  • 동작 불량·반복 차단은 사용 중지와 점검으로 연결했는가

자주 묻는 질문

차단기 레버는 전원을 켜고 끌 수 없다는 뜻인가요?

아닙니다. 수동으로 개폐하거나 점검 후 복귀하는 기능은 있습니다.

다만 일반 전원 스위치와 같은 편의 조작부로만 이해하면 보호 역할을 놓치기 쉽습니다. 가전의 평소 운전은 기기 자체 조작부와 설명서를 따릅니다.

노란 버튼을 눌러 전원이 꺼졌는데 고장인가요?

정상적인 시험 조건에서 노란 점검 버튼을 눌러 차단기가 동작하는 것은 기대하는 점검 결과입니다.

버튼을 누르지 않았는데 사용 중 차단된 경우와 구분하세요. 계획한 정상 점검 뒤에는 설명서대로 복귀하되, 복귀되지 않으면 사용을 중지합니다.

벽 콘센트에서 뽑은 상태로 눌러도 점검되나요?

전기적인 시험 회로는 정상적인 공급 전원과 차단기 투입 상태가 필요합니다. 뽑힌 상태에서 버튼을 눌러 보는 것만으로 동작을 확인했다고 할 수 없습니다.

부하 기기를 종료·분리하고, 이상 없는 제품에서 실제 제품 안내에 맞는 점검을 진행합니다. 물기나 손상이 있으면 시험을 위해 전원을 넣지 않습니다.

한 달에 한 번이라는 기준은 어디에 적혀 있나요?

이번에 확인한 써보니 고용량 제품의 실제 포장에 차단기 테스트 버튼 월 1회 작동 확인 안내가 있습니다. 본문 사진에서도 그 표시를 볼 수 있습니다.

모든 차단기의 보편적인 법정 주기를 뜻하는 설명은 아닙니다. 보유 제품에 제공된 최신 설명과 사용 환경에 맞는 점검 안내를 따르세요.

노란 버튼이 잘 작동하면 접지도 정상인가요?

버튼 점검만으로 벽 콘센트부터 기기까지의 보호접지 연속성을 확인할 수는 없습니다. 내부 시험과 접지 측정은 서로 다른 확인입니다.

접지 상태가 의심되거나 설치 상태를 확인해야 한다면 적절한 장비를 사용하는 전문 점검이 필요합니다.

고용량 3구라면 큰 가전 세 대를 함께 써도 되나요?

구수만으로 결정할 수 없습니다. 세 소켓은 입력 코드와 플러그를 공유하므로 동시 사용 전류와 전체 조건을 확인해야 합니다.

특히 기기 설명서에 단독 벽 콘센트 연결 조건이 있으면 그 조건을 따릅니다. 국내 220V에서 권장 합산은 세 소켓을 모두 더해 3,200W이며, 소켓마다 따로 주어지는 용량이 아닙니다.

차단기 부품에 C20이 보이면 20A까지 써도 되나요?

그 부품 표기를 멀티탭 완제품의 허용 전류로 옮겨 읽어서는 안 됩니다. 완제품의 본체·코드·플러그에 적용되는 정격과 사용 조건을 확인해야 합니다.

공식 상세의 16A와 공급 전압, 실제 제품 안내, 기기와 벽 회로 조건을 함께 봅니다. 차단되는 한계까지 부하를 늘려 시험하지 않습니다.

투명 덮개가 있으니 물이 튀는 곳에도 괜찮나요?

덮개는 조작부를 보호하는 구조이며 그 자체로 방수 성능을 증명하지 않습니다. 별도의 방수 등급이 확인되지 않은 제품을 물이 튀는 곳에 배치하지 않습니다.

정기 점검이 가능하도록 건조하고 접근하기 쉬운 위치를 고르며, 덮개를 열 수 있는 공간과 전선이 눌리지 않는 경로를 함께 확보합니다.

관련 키워드

써보니고용량 멀티탭누전차단기점검 버튼테스트 버튼과부하 차단차단기 레버보호덮개2구 멀티탭3구 멀티탭Subonyhigh capacitycircuit breakertest buttonresidual currentoverload protection